Showing posts with label craftivity. Show all posts

Sunday, December 8, 2013

Amazing Pizza Adjectives - FREE PRINTABLE

http://www.teacherspayteachers.com/Product/Amazing-Pizza-Adjectives-a-FREE-writing-craftivity-1014375
 I was able to create and post a new freebie to my TpT store! My students had a lot of fun doing this activity and craft.  You can read more about it on this post.
 We made a tree map of adjectives for pizza using our sense.  I color coded the brainstorming lists and blocked the blanks with the same colors.  That way the students knew which list to choose from when filling in blank.  

When we do shared writing or journal activities I've taught the students that they can copy any thing I write in green (as in "go ahead") and to read and do what I write in red (as in "stop, read, do your own").  It was a phenomenal tip I got from a fellow workshop-mate. 

We also had an impromptu chat on why y sounds like e.  Love it!
 

Amazing Pizza Adjectives is live and free in my TpT shop.  Go get it now.  Then reward your good move with a slice of steamy, spicy, scrumptious pizza.  I'd skip the carrots.

Five for Friday...almost


I am linking up with Kacey for some Five for Friday fun, but it is Sunday.  Is that close enough?

 In math we've been practicing counting by tens starting at any number and comparing numbers.  I made a print, cut and go product with number cards.  It is available on my TpT shop.  I also use many of the activities from Erica Bohrer's 0-120 charts and activities unit.  It was one of the first products I purchased on TpT.  It is great!

 We've been working on using adjectives in our writing.  Honestly, I wasn't going well so I reversed course and tried something new.  We made a chart of pizza adjectives one day.  We used all our senses and listed appropriate adjectives.

The next day I gave the students a fill in the blank story about eating pizza.  They had to use the adjectives to fill in the blanks to finish the story.

Finally, we got crazy with the scrap box and made slices a pizza to add to our stories.  It turned out very cute and even the struggling writers were able to correctly use adjectives in the story.

Next week we will transfer this skill to adding adjectives while we are writing individual stories.

Later today I am going to work on making this a freebie on my TpT store.

 Friday St. Nick visited our school.  He and his elves sprinkled gold tinsel all over the hallways.  They also left bags of goodies for each student to explore when they arrived in the classroom.  Mass hysteria? Check.  Happy kids? Check.  Get work done in the morning?  Not so much.

The kids were beyond excited all day!  Their smiles were actually bigger than the smiles on Krista Wallden's elves.
 Backing up a little now.  We did the disguise a turkey activity before Thanksgiving break.  I love, love, love the creativity the students showed when dressing the turkeys.  We had 3 Franken-turkeys, 2 singing turkey divas, 2 cheerleader turkeys, several super hero turkeys including SuperTurkey, SpiderTurkey, Hulk-Turkey, and Bat-Turkey and of course, Turkey Claus.  Their how-to stories were hilarious.  I used the free Thanksgiving How-To Writing pack by Lisa Richling.

 Have you ever played the Find Objects app?  It is very addictive and very fun.  It has one player and vs modes.  My boyfriend and I play vs mode on the tablet.  He's really competitive, but I am good. Ha!

Finally, I am so proud of my man!  His concrete condiment cup holders were featured in Food52.com's latest collection Fresh Caught: Oysters.  They took beautiful photographs that really show the quality of his concrete.  Also, check out his Etsy shop.  Any of these products would make for great gifts!

Saturday, June 1, 2013

Five for Friday: Mother's Day, Pumpkins, Frogs, Mad Science and Bubbles!


Wow!  May was busy in 27!  I'm linking up with Kacey from Doodle Bugs Teaching for a Five for Friday End of May Recap session.

1. I loved how our Mother's Day gifts turned out!  The kids did a really nice job and were very proud of their gifts.  I combined a few ideas from Pinterest.  First I created a little simile fill-in-the-blank.  We brainstormed ideas and the kids chose what worked best for their mom.  Next, I took pictures of all the kids.  Some just smiled and others made mom a heart.  Then I matted the pictures and simile sheets to construction paper.  Last each student got to choose a piece of scrapbook paper (12" x 12" books were on sale for $2.50 for 12 sheets...perfect!).  They glued the picture and paper onto the scrapbook paper and we were done!  We did the project in two short stints over two days (so I had time print pictures and mat).

{My mom is as pretty as a Barbie.  My mom is as smart as a scientist.  My mom is as sweet as a cupcake.  My mom is as cool as a rock star.  My mom is as kind as a Magic School Bus.}  
I didn't get the last one, but she was confident. ;)

2. Our pumpkin is still growing!  It put out about 6 beautiful flowers a few weeks ago and it is starting to take over the garden box.  The kids love checking on it when we go to the library or Music.  I don't live far from school so I will *try* to keep it watered this summer.  I would absolutely love for the kids to come back in August to see pumpkins growing on the vines.  We're keeping our fingers crossed!

3. During Teacher Appreciation Week I purchased Spring Direct Drawing Activities from Doodle Bugs Teaching.  I want more!  We drew the frogs one day last week and the kids were so engaged.  Everyone tried their best and we made it through the entire project with no tantrums or tears!  Yes, I teach 1st grade, but we can have some emotional issues when frustrated.  All the frogs are so different and have so much character!  I don't recall saying, "Step 7, draw teeth," but I must have because two frogs have prominent teeth.  Hilarious!  All the kids were really proud of their drawing, really took their time and proved they can listen and follow directions. Ha!

4. Last week our school had our annual Mad Science Day.  That day different classes within the grade level switch and teach each other a science project or experiment.  The idea is to get kids involved in science and scientific thinking.  I love Mad Science Day.  It is crazy and exhausting and fun!  A few days before we tested and learned our experiments.  I scoured Pinterest and my favorite blogs for new, fun science experiments and landed at 2nd Grade Shenanigans and the awesomeness that is Hope King.  I would have gladly bought a bird beak unit from her, but I couldn't find one.  I made up my own.

We used tweezers to pick out rice from dirt like a mockingbird, used a pasta scoop to catch Froot Loop fish like a pelican and used tongs to catch flying popcorn insects like a sparrow.  To even it up to 4 centers I added a computer station where the kids watch a YouTube video of a local type of bird using it's beak.  They watched mockingbirds, cardinals, robins, ospreys, pelicans and hummingbirds.  It was very fun and very easy (on me).  The kids did a phenomenal job explaining the centers and how the utensils represented different bird beaks.  I will definitely do this again!

5. Finally, our bubble bulletin board with the super cute bubble brains craft.  This craft is part of my Bubbles unit.  The kids still yell out every time they see bubbles.  I love it.  The students wrote their favorite bubble fact on the bigger gray bubbles.  I'll be sad to see this bulletin board taken down.  But not too sad, because we only have 4 1/2 more days of school!  Wahoo!

Sunday, May 12, 2013

Bombastic Bubbles and a Giveaway!


May is crazy.  Every weekday (and most weekends) of my calendar is booked with something.  Week of the Arts, Field Day, statewide testing and a Scholastic warehouse book sale top this week's agenda. I've been wanting to add more information and pictures from my Bubbles unit but couldn't find the time last week.

Bubbles! is a super fun, amazingly engaging, inquiry based science unit centered around soap bubbles.  We focused on questioning, making observations and informational writing.

 
{Creating our KWL chart and our finished version}
We had a lot of background knowledge about bubbles, but creating questions was difficult.  Many students just restated things they knew.  We worked on creating questions throughout the unit.  They got much better at it.  Yea!

 
 {How to Blow Bubbles}
Our first experiment was to learn how to blow the best bubbles.  Although our state science standards do not require first graders to use the scientific method, I did introduce them to it because creating questions or "want to know" topics was difficult for most of my students.  For this first lesson, I gave each student a mini bottle of bubbles.  They were 6 for $1 in the wedding section of Dollar Tree.  They were perfect for learning to blow bubbles.  We also learned that if you shake the bubble solution, you can't blow bubbles with foam...because foam is little bubbles.  No one made that mistake again.

 {Testing bubble solutions}
I used a lot of information from this blog post.  Talk about love!  We tested 5 different solutions: dish soap (experts say Joy and Dawn are best, plain soap, not additives and not antibacterial...and use distilled water), dish soap + corn syrup, + glycerin, + molasses, and + sugar.  I found a bucket of 27 bubble wands in the toy section of Wal*Mart.  Steve Spangler says plastic pipettes are simple, cheap bubble blowers.  I found this out too late, couldn't find them locally, but found 100 for about $6 on Amazon.  Maybe next year.  For this experiment I made sure all the wands had circles to blow through as to not taint upcoming experiments.

 I poured a little solution (one at a time) into plastic plates, one plate per group. (The center photo on the bottom row shows what each group had on their desks after all 5 solutions were tested.  Each plate has a different mixture.  Then we tested the solution and recorded our observations.  For our observations we looked for amount of bubbles (none, a few or a lot) and size of the bubbles.  I encouraged kids to also note other observations.  We learned that the solution of corn syrup or glycerin makes bubbles very strong.  So strong they bounce!  Also, the bubbles landed on dry objects and didn't pop.  What?!?

We agreed on a signal to stop testing, "Wands down, hands up!"  I set a timer and let kids share and experiment for 2 minutes.  It was enough time to get a good feel for the solution and try a couple ideas that popped into their heads, but not too long to get crazy.  After each test we talked about the bubbles each solution made, recorded our observations and made an opinion on the quality (happy face, straight face or sad face).

During this experiment some kids really let their inner scientist loose!  It happened all through the unit, but especially in this lesson.  Kids that don't like anything, like this.  Kids that never volunteered information were dying to share cool stuff they observed. My little heart grew three sizes that day.

We turned our observation notes into an opinion writing piece about the best bubbles solution.

 {Unpopable Bubbles!}
How do you follow up a bonanza of bubble solutions?  Why, with unpopable bubbles of course!  We used one of the best solutions distilled water, dish soap and glycerin, plastic plates and drinking straws.  This was a general bubble fun day.  Anything they could think of and try was fair game, as long as they shared interesting things with the group.  We learned that bubbles have flat sides where they touch, you can blow a really big bubble, or a bunch of little ones and if the straw is wet, you can reinsert it in the bubble and make it bigger.  They also learned that if they blew a bubble inside the bubble the new bubble would move outside the bubble.  

 {Bubbles inside bubbles and holding a bubble}
We watched a video of how to touch a bubble without popping it.  Then we tried it!  The kids also blew a bubble, caught it on the wand, then used the straw to blow a bubble inside that bubble.  They liked watching the inside bubble get absorbed by the wand bubble making it bigger.  

Once they blew bubbles and caught them in their (wet) wands, someone tried to catch 2 bubbles, but guess what.  They could make the bubbles bounce off each other and a new game was invented!

 Of course it wasn't all fun and games.  We had to do real scientist work...like writing papers about our experiment results.  The students ended up with a great informational book about bubbles which included a how to, the opinion piece and several information pieces about their bubble knowledge.

For an amazing workshop I attended the presenters taught us about text mapping.  It is when a book is copied into scroll form so students can see all the pieces at a glance (or walk across the classroom).  We marked it all up with Common Core goodness-text features, vocabulary, questions and answers, etc.

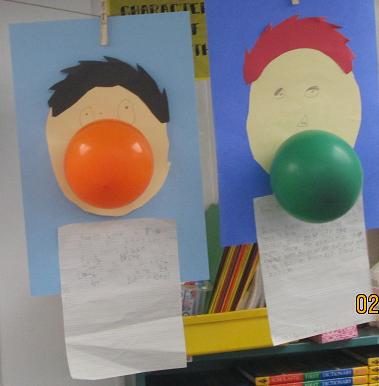
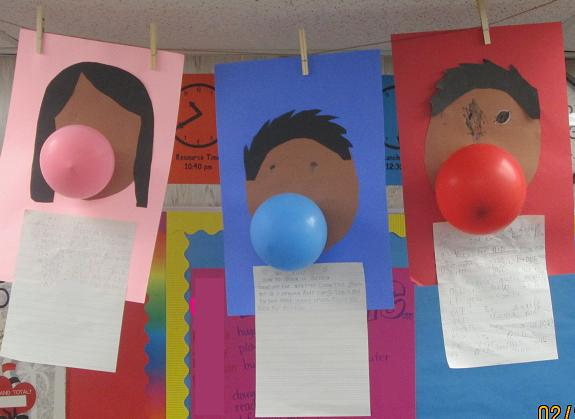
{Bubble Brains: a craftivity for bulletin board display}
We finished up our unit with a craft.  Each student made him or herself into a bubble blower and wrote a fact on a construction paper bubble.  I wrapped the bubble in plastic food wrap to make it shiny, then hung all the bubbles and bubble brainiac on our bulletin board.  I didn't get a picture, but I'll try to add one soon.

Bubbles! was by far the BEST unit I've taught.  The kids were genuinely engaged in learning how to be a good, questioning, experimenting, communicating scientist!  They devoured the non-fiction and fiction books about bubbles.  Every day they asked if we were doing another experiment.  So many of them told me about conversations they had with friends, siblings and their parents about bubbles.  Are you kidding me?  These kids were loving science and I love it right back!

Bubbles! is a great end-of-the-year set of activities for kids.  They can show off their science, reading and writing skills while still learning, work together and have fun!

OK, if you've made it to the end of this crazy-long post leave a comment to be entered to win your own copy of the unit!  Get 3 entries by:
  1. Leave a comment (easy-peasy)
  2. Follow my TpT store or this blog (leave a comment to let me know you did it)
  3. Post about the giveaway (blog, Facebook, Twitter, whatever...either copy to web address or just tell me you did it...I trust you.)
I'll randomly select a winner Friday afternoon!

Sunday, May 5, 2013

Bubbles! An Inquiry Based Informational Reading and Writing Unit


I just uploaded my newest unit and it is by far my favorite thing we've done all year!  I created it for a set of workshops I attended.  My students LOVED doing the bubble experiments, reading informational text, expository, informational and opinion writing.  I have a lot more to post about this unit, but wanted to get this up now.
It's a great unit for end-of-the-year learning fun!

Thursday, April 25, 2013

Ouch-less Crafts for ow and ou

 Last week we made two, count 'em, one-two super cute craftivities!  Each helped students practice reading and writing ow or ou words.  Cow says, "Ow!" is part of the Working with Vowel Team OW pack.  Ouch Mouse is part of Working with Vowel Team OU and is available as a free download.

 I *LOVE* how the cows turned out!  They each have so much character.  I especially love the cow in the middle picture.  She looks like she is jumping over the moon with her ears up like that.  After the cow was cut, glued and dried the students chose 5 words with ow in them to write on the spots.  They like walking around reading the cow spots.

The students had a blast creating their Ouch Mouse!  I had the students make their own whiskers and tails.  The rest of the pieces are tracers.  (The download has all the tracers.)  Seriously, who doesn't love sticking Band-Aids all over an adorable mouse.  Most of the stories involved some amazing mouse trick in which the poor mouse failed miserably.


This mouse has lip gloss on because after the "mouse" ran to get in line she tripped and fell.  Lip gloss was the only thing that made her feel better.  Interesting...


The mouse on the left is screaming crying (to get more attention).  The creator of the mouse on the right very deviously asked, "Can we put the Band-Aids...anywhere?"  He thought a Band-Aid between the eyes was hilarious!  It is pretty funny.

I really love doing crafts with this class.  We try to do at least one on Fridays.  It's a great way to relax the brain a little after our assessments and to stir up our creative juices.  The kids are really helpful to each other sharing materials and ideas.  Now, don't get it twisted.  This does not happen too often with this class, but I love when it does.  I can really tell they are working at being kind to each other.

Again, download the free Ouch Mouse craftivity here or get the whole ou literacy center pack here.  Cow says, "Ow!" is available in my OW literacy center pack.

For the last two weeks we've been working through a new unit on the practice of science using bubbles!  Talk about good times!  I'm tweaking the unit and hope to post about it soon.

Saturday, April 13, 2013

NEW Product - Working with Vowel Team OU and a FREEBIE Craft!

My newest TpT product is a big, old, pack of 8 literacy activities centered around vowel team ou and covering several Common Core State Standards in Reading Foundational Skills in grades K, 1 and 2.  The activities include:
  • Counting syllables
  • Word familes -ouse, -ouch, -our, -oud, -ound, -out
  • Phoneme boxes (see this post for a photo of phoneme boxes in action)
  • 2 Matching games
  • Roll - Say -Keep game boards and word cards
  • Let's Go to the House game board
  • Word search
  • Ouch Mouse craftivity and writing pages

The Ouch Mouse craft is also available for FREE!  It is a super cute mouse with "ou" words on bandages such all over her.  Students will also create a story of what happened to Ouch Mouse causing the need for so many bandages.

If you use Ouch Mouse in your class I would love to hear what interesting stories your students create for their mouse!

In honor of the newest product I'm also throwing a 20% off sale through Sunday!

Tuesday, March 26, 2013

Working with Vowel Team OW


Working with Vowel Team OW! is my newest product on TpT is on sale in my store!  It is a 70 page pack for working with ow as in cow.  It includes 7 center games/activities, a printable word search (my kids LOVE word searches) and a fun and cute cow craft for a bulletin board display.

 Activities include:
*Syllable Count and Sort
*Word Families Read and Sort for -ow and -own
*Phoneme Boxes {Elkonin Boxes} and sound/letter tiles (see this post for phoneme boxes in action!)
*Matching pictures to words
*Memory Match
*Roll - Say - Keep game board and word cards
*Flowers on the Vine board game
*Word Search {with answer key}
*Cow Says, "OW!" craftivity

All the activities are in color and in black and white line drawings.  This baby is jam packed with fun learning of the ow sound.

My students like playing Memory Match and Roll-Say-Keep.  We can get a little competitive, but that's OK.  It fuels the learning fire!

Each game has an instructions page that can be printed and posted at the center area or on a document camera.  

From now until Saturday, March 30 Working with Vowel Team OW is on sale for $3.  After that it will go to the low, low, low price of $5.  =]

Sunday, March 17, 2013

If You Give a First Grader a Compound Word...


This week our reading series basal story was If You Give a Pig a Pancake so did a little author study of Laura Numeroff and the If You Give a... series.  One of the skills of the week is compound words.  
We made a giant list of compound words, then chose a word from the list to fill in the blanks of Pig's sign.  The definition of compound words is student created.  They're getting it!

Here are some of my favorites:


  "If you give a pig a bookbox she'll want a mailbox to go with it."


 Both read "If you give a pig a toothbrush, she'll want toothpaste to go with it."  The first illustration is funny.  The pig looks like the toothpaste tastes nasty.

"If you give a pig SpongeBob, she'll want Patrick to go with it."  So funny!  He even made his pig look like SpongeBob.

We got a little loose with the compound words, but the kids were having fun thinking them up.  SpongeBob is really pushing it, but they talked me into adding to the list.
 
Some students didn't finish their pig and I know there are more creative compound words to come.  I'll post more examples next week.
 
Speaking of next week, my formal observation is Tuesday.  Can you say *NERVOUS*?

Saturday, March 2, 2013

Bubble Blowing Bandits!

Last week we ended our "How to..." functional writing with "How to Blow a Bubble".  Could this be more fun?  After see this on Pinterest I searched similar lessons, made a mash up of what would work from my students and our writing guidelines.


I asked the class how to blow a bubble.  Of course they yelled, "Put it in your mouth and chew!"  like I was crazy for even asking.  So I did it, wrapper and all.  First, yuck!  Second, they started to realize how explicit instructions need to be to teach the reader.  We decided to take off the wrapper and put the gum in our mouth.  Then we agreed to chew until the gum got soft.  (Pretty important step.)  Next came my favorite part of the lesson.  When asked what comes next, one boy said, "Wrap the gum around your tongue like a blanket."  What a great visual!  P.S.  All the kids blatantly stole his wording, which I loved.  Last we blow and blow until the bubble pops.

Not all the of the kids could blow a bubble, but boy did they love trying!  One girl got upset she couldn't do it.  It was fun to watch the kids who could try to teach her.

*Drum roll* I present my Bubble Blowing Bandits!


They've never been so on task all year!  The second boy pictured won the bubble blowing contest.  Right after I snapped the picture the bubble popped all over his face.

The kids used our "How to..." organizing writing paper to create a rough draft of their paragraphs.  The next day they corrected errors and edited a partner's work (checking for punctuation and capitals) and began final drafts.


After the final drafts were finished we made a "How to Blow a Bubble" craftivity using construction paper to make their faces and balloons as bubbles.  Each student pasted the final instructions under their big balloon bubble.  This was by far the best writing lesson I've ever taught.  It will definitely get repeated in coming years!